ProVal License Server Installation Guide
ProVal License Server Installation Guide
Overview
The ProVal License Server (PVLS) brokers ProVal licenses to users. PVLS allows any number of users to share a given number of licenses as long as it is not at the same time. PVLS keeps track of the number and type of licenses that are available as users check out licenses and check them back in.
How it Works

All ProVal users have individual PROVAL.INI files that store their ProVal configuration settings. One of these settings, LicenseDir, points to a folder which contains files that are written to by both users and PVLS. That is why it is mandatory for all ProVal users and the License Server to have write access to the LicenseDir folder.
Pre-Installation Procedure
License Server Operating Modes
The ProVal License Server may be run as a Windows Service or as a Windows Application
- Running the License Server as a Windows Service typically offers greater security since there is no need to remain logged in to the system during operation.
License Server Checklist
Before you begin setting up your license server, you must have:
- A machine that is to be designated the license server. Refer to Appendix A for system requirements.
- A USB network key which plugs into an available port in the license server machine. Single user hardware keys CANNOT be interchanged with network keys. If you want to move from one licensing mode to the other, please contact sales@winklevoss.com.
- License data (typically comprising eight rows and four columns of numbers) provided by WinTech. This license data updates the number of licenses, types of licenses and expiration date and is required for the PVLS to function.
Installing as a Windows Service or Application
-
- Install ProVal on the PVLS machine: Follow the ProVal Installation instructions (readme.doc) to install ProVal on the designated PVLS machine.
- Create a ProVal Working Directory (typically, this would be C:\PROVAL).
- Copy the following files from the ProVal installation folder into the ProVal Working Directory (from Step a):
- WinTechService.exe
- WinTechService.License.ini
- ProVal.ini
- LicenseUnreg.bat
- LicenseReg.bat
- Define the License Server data file directory (LicenseDir) : Create a folder either located physically on the license server or on a common file server to store the License Server data files e.g. C:\PVLS. All ProVal users as well as the license server account MUST have write access to this folder. This folder is known as LicenseDir. WinTech recommends that the LicenseDir folder NOT be the same as the ProVal application folder.
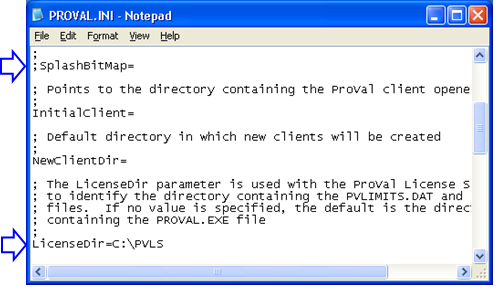
- Edit the following parameters in the PROVAL.INI file:
- Under the [Config] section, comment out the SplashBitMap setting using a semicolon (;).
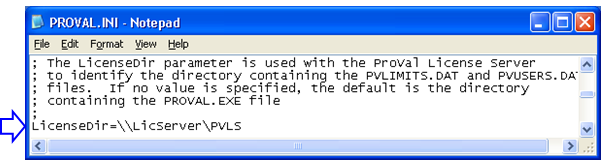
- Update the LicenseDir setting in the PROVAL.INI file to point to the License Server data file folder defined in Step 2 above.
NOTE: Use UNC (i.e., of the form \\server\share\) to refer to network paths when installing as a Service – mapped drives are not acceptable.(Typical PROVAL.INI for ProVal installs)
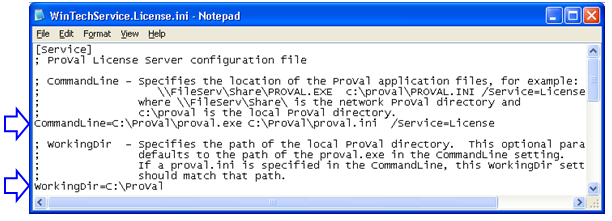
- Edit the necessary parameters in the WinTechService.License.ini file:
- CommandLine: The first parameter should have a fully qualified path to the PROVAL.EXE file within the PROVAL installation folder and the second parameter must have a fully qualified path to the PROVAL.INI file.
- WorkingDir: This must be set to the directory containing the local proval.ini file (refer to step #1).
- The rest of the settings should not be touched in ordinary circumstances.
- Install ProVal on the PVLS machine: Follow the ProVal Installation instructions (readme.doc) to install ProVal on the designated PVLS machine.
(Typical WinTechService.License.INI)
Preparing the License Server Data Files
Plug in the key: At this point, plug the ProVal Network Key into an appropriate port on the license server. Inspect the server carefully and unplug any other attached network or single-use ProVal keys.
NOTE: Additional keys can interfere with the operation of the License Server.
-
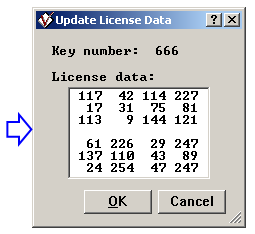
- Start ProVal and navigate to File → License Manager. Click the “Limits” button and then the “Update” button. Enter the supplied license data codes as shown below (you will receive this in the cover letter with your ProVal license key or via e-mail).
- Click OK and exit ProVal.
Registering and Starting the License Server
Up to this point all setup has been identical whether PVLS was to be run as a Windows Service or an Application. The following steps will now vary based on running as a Service or Application.
Registering the License Server
The License Server must first be registered. The LicenseReg.Bat script performs this registration function. The contents of this file are very simple. By default it looks like:
WinTechService.exe License /Reg
The value following the /, in this case /Reg, determines whether PVLS will be registered as an application, a Service or both. The possible values are:
/Reg registers both
/RegServ registers only the Service
/RegApp registers only the Application
NOTE: This registers, but does not start, the License Server.
Running PVLS as a Service
-
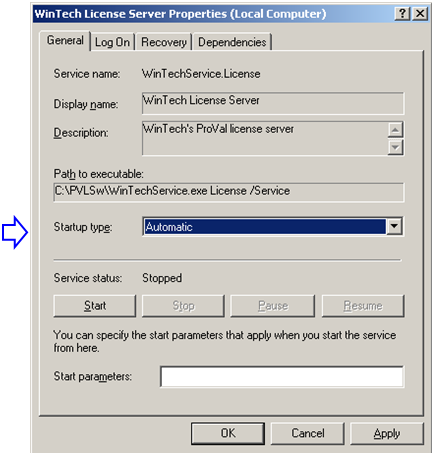
- If the License Server is to be run as a Windows Service, navigate to your list of Services and locate the “WinTech License Server” service. Double-click on it to open up its properties and change the Startup Type to “Automatic” (by default it is “Manual”), which ensures that the Service is started automatically every time the License Server machine restarts.
-
- In most cases, you will need to configure the Service to use a log on that has write access to the LicenseDir folder. Select the “Log On” tab and modify the “Log On As” setting with a fully-qualified username and password as shown below:
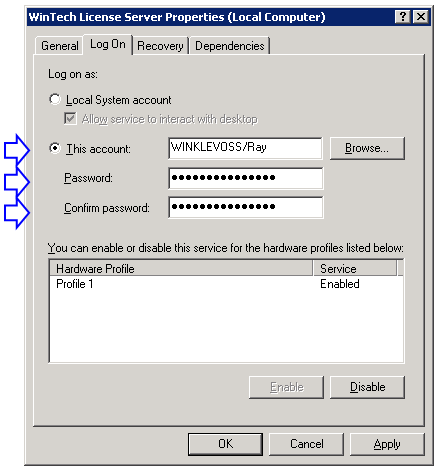
- To start the Service, select the “General” tab and click the “Start” button. Check the Microsoft Windows Event Viewer to ensure that the service is functional.
NOTE: Noteworthy events and handy troubleshooting information for the Service may be viewed in the Windows Event Viewer under the Application Log.
Running PVLS as an Application
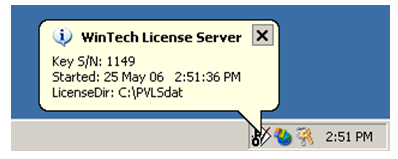
To start the License Server (as an Application), click Start → Programs → WinTech → License Server → Start License Server. If everything has been installed correctly, you should see the ProVal License Server icon on the system tray, with an information balloon reporting license server details as shown:
NOTE: You may put the Start License Server entry into the StartUp folder, if you wish to ensure that the License Server starts automatically every time a user logs in.
Uninstalling the License Server System
Follow the following steps to uninstall the ProVal License Server:
- Ensure that all ProVal workstations are disconnected from the License Server.
- Locate the ProVal working directory, (C:\PROVAL for local installs and C:\PROVAL for network installs in the examples above). Run the “LicenseUnreg.bat” by double-clicking on it.
- This will uninstall the ProVal License Server regardless of whether the PVLS was set up as a Service or an Application.
Workstation Configuration
- If it hasn’t been done already, install ProVal on the workstation : Follow the ProVal Installation instructions (readme.doc) to install ProVal.
- If it is not already created, create a share to the ProVal License Data folder.
NOTE: All ProVal users must have write-access permissions to this ProVal License Data folder. - In the PROVAL.INI files for EACH workstation, set the LicenseDir with the ProVal License Data Folder share as shown below.
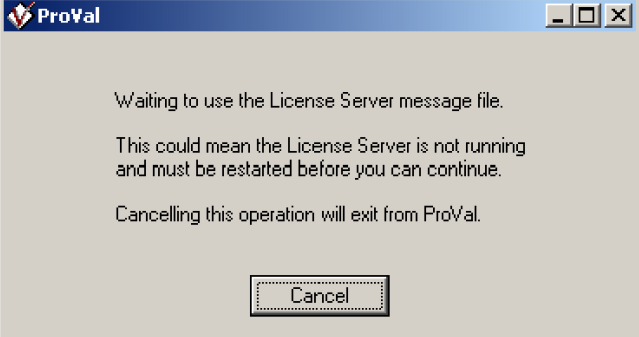
License Server Unavailability
ProVal workstations are able to detect whether the License Server is available or not. If no sources for ProVal licenses are detected at startup, users will see this message:
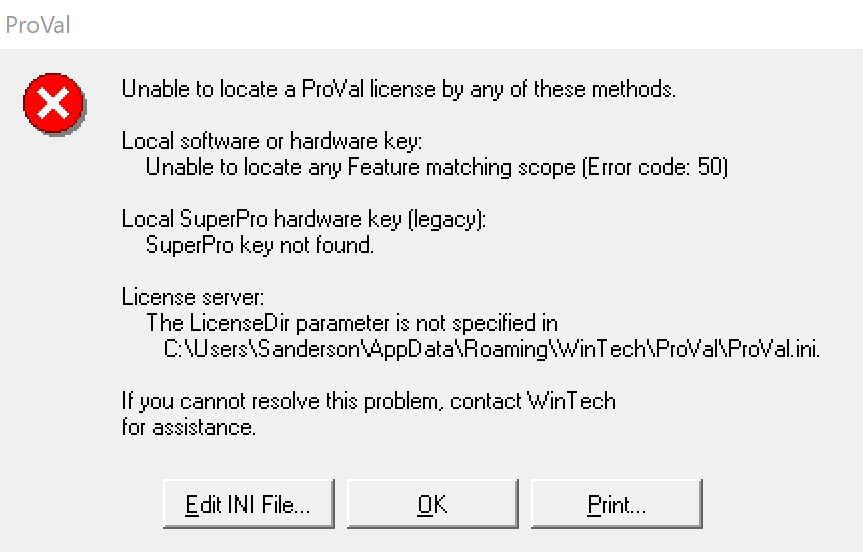
If the presence of a license server has been established, a license has been checked out and subsequently, the license server becomes unavailable, users may receive the following message.
Appendix A: License Server System Requirements
Minimum Requirements
|
Operating System |
Microsoft Windows 8 Family. Microsoft Windows 10 Family. Microsoft Windows Server 2012 Family. Microsoft Windows Server 2016 Family. Microsoft Windows Server 2019 Family.
NOTES: ProVal does not work on Mac OS®, UNIX® or Linux. Compatible with 64-bit OS, running as 32-bit application. |
|
Processor (CPU) |
Intel Celeron® 500 MHz. or equivalent (minimum). Intel Pentium® IV 1 GHz. or equivalent (recommended).
|
|
Memory (RAM) |
1GB (minimum) to 1.5GB (recommended) of available memory per processor. |
|
Disk Space |
500 MB (for ProVal program files) + additional space for client files. |
|
Additional Components |
Microsoft .Net Framework 4.5 (or later) |